Famous Artists 2 Messy Play Kit Guide

Ready to dig into your Famous Artists 2 Messy Play Kit? This kit features all female artists! Before you get started in this kit, remember that we focus on the PROCESS of art, not the PRODUCT. We don't expect your kids to paint like the experts, and we don't want them to be disappointed from expectations that are too high. Messy Play Kits are more about the process of exploring the materials and techniques, and knowing that practice will help hone skills and develop more individual creativity. Learn more about art process vs product in my blog post here.
On this page you'll find detailed step-by-step instructions, ideas to extend the learning, and some links to other resources. Feel free to reach out if you have any questions about your kit. Now go get messy!
Jump To:
Frida Kahlo: self portrait
Georgia O'Keeffe: magnified painting
Helen Frankenthaler: poured paint
Lauren Clay: papier-mâché
Additional Resources
More Messy Play Kits
Frida Kahlo: self portrait:
|
Artist bio: Magdalena Carmen Frida Kahlo y Calderón, better known as Frida Kahlo, was a Mexican painter famous for her self portraits (or paintings she made of herself). Her art explored who she was and how she felt in her unique life experience as a female Mexican artist. Mixing the way she looked in the mirror with creative make-believe elements, Frida Kahlo’s paintings became important symbols of Mexican culture. Today, many other female artists feel inspired by her work. Learn more about Frida Kahlo here. In this kit, you will get to explore creating your own self-portrait using crayons! The mirror will help you to see what you look like so that you can draw yourself. Then, just like Frida Kahlo, you can add fun, make-believe elements that represent who you are and what you love—like a ball from your favorite sport or a picture of your stuffed animal! |
1. Set up your art space. You’ll need both sets of crayons, a few pieces of art paper, and the mirror. Open the mirror and set it up so you can see yourself in it.
2. Use the crayons to draw your face! You can be as detailed as you want, and as real and accurate, or as silly and creative as you want!
- Can you find a crayon that matches the color of your skin? If you look closely at your face, you may see that your skin changes colors in some places, so you may need to use a few different crayons to match. What about your eyes? What color are they, and can you find a crayon that’s close to your eye color? Hair can be tricky too. It’s often multiple colors too.
What are they learning?
- Frustration: you may find your child gets frustrated if their art doesn’t look the way they want. Help them to remember that that’s part of the art process- we have to practice to improve our skills, and over time it will get easier. Also, as the artist, you get to decide when a piece is done or if it needs more! Parents, you can also help them identify the different parts of their faces to draw, and look at what shapes they are (breaking things down into shapes makes it easier to draw).
Georgia O'Keeffe: magnified painting
|
Artist bio: Georgia O’Keeffe was an American artist who loved to magnify (or make bigger) her favorite things and then paint them. From bright flowers to tall towers, Georgia O’Keeffe created colorful artwork that looked like ordinary things, but through a magnifying glass. She is one of the most important female artists in American history. Learn more about Georgia O’Keeffe here. This kit includes a magnifying glass and paint. So, you can find a picture of your favorite thing—a building, a flower, a toy, or food—and watch it get bigger under the magnifying glass. Then, just like Georgia O’Keeffe, you can paint what you see! |
1. Find something in your house that you’d like to paint. You’ll be painting it up close, using a magnifying glass. You can try your favorite toy, or a flower, or something on the table in front of you!
2. Hold the magnifying glass in front of your item, and look at it carefully. Up close, do you notice a different texture than you see without the magnifying glass? Do you see small details?
3. Use the paint and paintbrushes to paint your item. Try to have your object fill up the entire page. You could even try to paint just one part of your item (like your teddy bear’s face) and fill the whole paper with that.
4. There are more papers, so you can try again with other objects! (Note: we will use the larger paints in the next activity, so try not to mix those colors together too much!)
What are they learning?
- Empowerment and creative representation: they get to choose what to paint, how big to make it, and what details to include or leave out. That’s powerful for young children, who don’t often get to make a lot of their own decisions.
- Color mixing: as they paint, they will mix the colors together and see how they blend together to form new colors! You can also scoop some paint out onto a plate for them to mix together even more, before adding to their artwork.
- Fine motor control: there is a large and a small paintbrush included in this kit. Great practice for small hands!
Helen Frankenthaler: poured paint:
|
Artist bio: Helen Frankenthaler was an expressionist painter (or an artist who wanted to express her emotions through paint). She invented a type of painting called “soak-stain,” by adding liquid to paint to make it really thin. Then, instead of painting her canvas (fabric wrapped around a wooden frame) with a paintbrush, she poured the paint so it soaked into the canvas until it was stained (or left a colorful mark). This way of painting became known as “color field” painting. Many artists use this type of painting today when they want to combine lots of colors onto one canvas! Learn more about Helen Frankenthaler here. You get to try this type of painting in this kit! You will receive small canvases and paint that you’ll water down. Then you can pour the colors onto the canvas, wait for it to stain, and see the final result! |
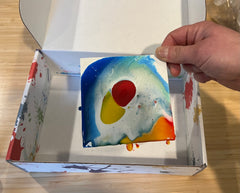
1. Open the 4 containers of large paint. Add water to fill each container, and either use the included stir sticks to mix, or replace the lid and shake. You want the paint to be really thin so it’s easier to pour.


2. Empty the Messy Play box, and place the empty container inside the box, upside down. Place one canvas board on top of the container, so it’s balancing in the air.

3. Use the pipettes to drip paint on top of the canvas board, or pour directly from the jars of paint! The paint will drip off the edge of your canvas onto the box- that’s ok!


4. Continue pouring paint and switching colors to make various designs. You can even pick up the canvas and move it around carefully to guide the flowing paint. You can tap the canvas on the box to make the paint move too.


5. Repeat with the other 2 canvas board you have! Leave them to dry when you’re done.

What are they learning?
- Process vs product: this activity is ALL about the process! It’s hard to know what your painting will look like at the end. The 4 colors are different thicknesses and flow differently, plus it depends on where, how much, and how they pour them and move the canvas!
- Self expression: just like Helen Frankenthaler, they can express themselves and their emotions through paint. See if they can express various emotions through their poured paint, or if it reminds them of anything after it’s done.
Lauren Clay: papier-mâché:
|
Artist bio: Lauren Clay is still alive today! She lives in New York City and creates art using papier-mâché. This means that she takes small pieces of paper and attaches them to shapes with thin glue. The paper creates patterns with splashes of color that are so interesting to look at! Learn more about Lauren Clay here. In this kit, you get to learn to papier-mâché like Lauren Clay! You’ll use the packaging paper, ripped into strips or small pieces, make a flour/glue mixture, and build something! Once it’s dry, you can paint it with the leftover paint from the other activities. |
1. You’ll want to do this activity on a tray, and it will be pretty messy, so stay near a sink for easy cleanup!
2. Empty the flour into a bowl. Add the glue, 1/2 cup of water, and stir to mix. It will be clumpy, but try to mix as much as you can. Add more water if necessary- you want it to be a thin mixture. The thicker it is, the longer it will take to dry.
3. Take the packaging paper and rip it into strips. It will rip easily and straight when ripped in one direction- ripping the other way is tricker. Once you have long strips, rip them into smaller 1-2 inch pieces.

4. First, let’s practice the technique: Dip one piece of paper into the flour mixture, and then scrape most of the mixture off. Roll this piece into a ball, and place it on your tray. For the next piece, dip it and wipe it off, and wrap it around your first ball-shaped piece. Continue with more pieces of paper, layering them and covering your first piece.

5. When you get the hang of it, see if you can create something. Can you make a star? Or an animal? If that’s too tricky, try building it flat instead of making it 3-dimensional (see right image below).


6. When your art is dry, which might take a few days, you can even paint it using the leftover paints from the kit!
Clean up: papier-mâché shouldn’t go down the drain, so wipe as much excess off the bowl, hands, tray and throw it away.
What are they learning?
- Responsibility: this is messy project! Have you child help with the set up and the clean up so they are more involved in the process and take ownership. It also teaches them that being messy is ok, as long as you prepare and clean up appropriately!
More Famous Artists Play!
There are so many ways to continue learning about female artists. Here are some of my favorites.
- Look up Agnes Martin's art: she makes artwork that is very visually relaxing! She hand paints straight grid lines that look perfect from afar, but look hand drawn up close. Can you make something similar?
- Bridget Riley makes optical illusions. There are some very cool and easy options to find online, like this one from Hoopla Kids Doodle.

