Mythical Mountain Messy Play Kit Guide

Ready to dig into your Mythical Mountain Messy Play Kit? On this page you'll find detailed step-by-step instructions, ideas to extend the learning, and some links to other resources. Feel free to reach out if you have any questions about your kit. Now go get messy!
Jump To:
Phoenix Slime
Mermaid and Dragon Scale Painting
Mythical Mountain Sensory World
Additional Resources
More Messy Play Kits
Phoenix Slime
1. Empty the glue bottle into a small mixing bowl, add the color changing pigment and eco glitter and stir with a spoon until throughly blended.
2. Add one tablespoon of warm water to the glue mixture and stir. Add one teaspoon of the liquid starch to the glue mixture and continue to stir. You’ll see the mixture start to coagulate. Continue to mix. Continue adding the liquid starch one teaspoon at a time, stirring to fully incorporate it as you add. You won’t need the entire bottle of starch. You’ll see the mixture start to pull away from the bowl and stick to itself more and more.
3. Touch the slime now. If it’s still sticky, continue to add liquid starch teaspoon by teaspoon until the slime comes together and stops sticking to your hands (about half of the bottle). When the slime no longer sticks to your hands, you have the right consistency! It should stretch and droop, but not be sticky.
4. Now enjoy it! Play with the slime- bend it, stretch it, let it drop but catch it before it hits the floor! If you stretch it out and then quickly bring it back together, you might be able to capture a slime bubble! This special photochromic slime changes color in sunlight, so play with it inside and then in direct sunlight. What happens when you place it half in the sun and half in the shade?

|
Note: Slime is made of entirely washable ingredients, but it will stick to clothing, skin, and anything else it touches. It sticks to itself well, so use that technique for getting it off your hands. Be careful not to get it on carpet or other non-machine washable items, because that would require lots of hand scrubbing! |
What are they learning?
- Fine motor control: Squeezing pipettes, unscrewing caps, pouring and mixing are great for strengthening fine motor control and building self-help skills
- Science: it’s a fascinating chemical reaction watching how two liquids (glue and liquid starch) combine to become slime!
- Sun safety: the color changing powder is UV reactive, meaning it changes color in sunlight. This will happen most quickly in direct sunlight but you can still see it happen on cloudy days, because clouds don’t block all of the UV light. This is why it’s important to wear sunscreen even when it’s cloudy!
Mermaid and Dragon Scale Painting
1. Place a piece of art paper on the art tray in your workspace.
2. Fill a small cup with water, open the watercolor pallet and get the paintbrush wet.
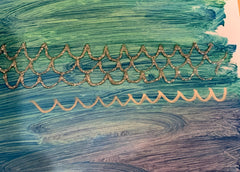
3. Paint the whole background of the art paper in watercolor style. To do this, choose a few colors (mermaid might be green, blue and purple) and use a wet brush to paint the colors on the paper in large splotches. The more water, the more the paint will blend with the colors around it. The less water and the more paint you use, the more intense the color will be.


4. Try a few color combinations on other pieces of art paper. What colors would you use if you were making a dragon? Unicorn? Another magical creature?
5. Let the paper dry completely.
6. Once it’s dry, use the glitter glue to make scale shapes on the paper (like a continuous letter “u” across the page). This makes the watercolor background look like it’s mermaid scales or dragon scales!
 .
. 
7. If you made backgrounds that could become other creatures that don’t have scales, what shapes could you draw with glitter glue instead of scale shapes? For example, can you make a red/yellow page look like the feathers from a phoenix?

|
Clean Up: When your artwork is dry, hand up it on display! Your paint bowls and art tray can be rinsed. |
What are they learning?
- Process versus Product: This is a key component of Messy Play Kits’ products. We focus on the process of making rather than the final product. You can choose whatever colors you want, and explore how to combine them and blend the colors together. If you make mermaid or dragon scales, great! If you make something else entirely, that’s great too!
- Biology: this project involves thinking creatively about creatures that don’t exist but are based on real animals that do. In order to draw mermaid and dragon scales, you can think about what fish scales look like. To draw phoenix feathers, you can think about bird feathers. Research online if you need help picturing these animals and how to make them if need be.
Mythical Mountain Sensory World
1. Make the gelatin:
1. Empty the gelatin into a small bowl, and add one of the pipettes of liquid watercolor (either green or orange- you choose! The other will be used in the oobleck below).
2. Put 1/4 cup of cold water into a small bowl and sprinkle the gelatin on top. Let it hydrate for 2 minutes.
3. Carefully, with an adult’s help, add 1/2 cup of hot water and mix until the gelatin has dissolved.
4. Place in the fridge to set (take about 4 hours).
2. Make the oobleck:
1. Empty the bag of cornstarch into a mixing bowl. Pour it carefully so it doesn’t all poof up into the air. Add the other pipette of liquid watercolors (the one leftover from above).
2. Add a little less than 1/3 cup of water and stir until it’s fully mixed. You should have a substance that acts as both a liquid and a solid. When you scoop it up, it’s hard and cracks, but when you let it drip off the spoon, it pours like water.
3. Set up your Mythical Mountain Sensory World:
1. Cover your workspace with the paper backdrop. Place the bowl of gelatin in one area, the bowl of oobleck in another, and the moldable sand in a 3rd spot.
2. What should each of these sensory materials represent? A sandpit? A swamp? A magical ocean that gives powers to anyone who touches it?
3. Get creative and have fun! You can keep the play simple and just dig into the sensory materials with your hands, or you can elaborate it into a whole pretend play scene! Add magical creatures, draw backgrounds on the paper like paths and trees and mountains, come up with stories for each of the areas, whatever you want! The point is to have hands-on fun with the materials and enjoy them however you want!
|
Clean Up: The oobleck and gelatin can be saved for a day or two in the fridge if you want, and should be discarded after no more than 2 days. The moldable sand (if it doesn’t get too mixed up with the rest) can be saved in a plastic bag for continued use! |
What are they learning?
- Science: There are a lot of different materials in this project, with different properties and behaviors! Gelatin is a material that starts off as a liquid and transforms into a solid over time. Oobleck is a non-Newtonian fluid, which means that the viscosity of the fluid depends on the shear force (in other words, when you put pressure on it, it acts as a solid, and when the pressure is gone it acts as a liquid). Imagine what the world would be like it other liquids acted this way (think about water, or milk, or blood in your body)! Moldable sand feels like magic- it’s soft and squishy and moldable like wet sand, but somehow dry!
- Creativity: this project is meant to be very open-ended. We’ve provided multiple different sensory materials and are going to let the kids take over and explore. They might be focused on the sensory materials, or they might come up with elaborate story about their magical world and the creatures in it, or maybe they want to focus on art and draw in the background scenery. Maybe they reenact a story from their own lives, such as a trip you went on recently, or a book they have read. If you have multiple kids ,you might notice that they play differently with this as well. Sit back and see what your kids do here, and remember to let them lead.
- Open ended sensory play helps build motor skills, hand eye coordination, problem-solving skills, basic math concepts, and so much more! Children learn through actively exploring their environment, so give your child some kitchen utensils and let them explore and dig and see what they can do with the materials!
More Mythical Play!
There are so many ways to continue playing with and learning about mythical creatures and worlds. Here are some of my favorites.
- Messy Play Kits has other mythical-themed activities too! Check out our Unicorn Sensory Bin and more of the color-changing slime kits that are named after mythical creatures!
- Check out the list of fantasy-themed crafts on the All Kids Network! They have a ton of ideas, including this adorable bubble wrap dragon painting craft and this dragon breathing fire project!
- Learn about mythical creatures, their origins, and what some common creatures are on Twinkl.
- This Pinterest Board by Brigetta Barone Barone has a ton of great hands-on activities and projects for preschoolers with a mythical and fantasy theme!

