Polar Fun Messy Play Kit Guide

Ready to dig into your Polar Fun Messy Play Kit? On this page you'll find detailed step-by-step instructions, ideas to extend the learning, and some links to other resources. Feel free to reach out if you have any questions about your kit. Now go get messy!
Jump To:
Color Changing Dough
Pom Pom Splat Snowman
Snowstorm in a Bottle
Salt Crystal Snowflakes
Additional Resources
More Messy Play Kits
Color Changing Dough:
1. Empty the playdough onto a tray, surface, or into a mixing bowl.
2. Add the pigment powder, and carefully combine the two together. You may use a mixing spoon, or just knead with your hands! The powder will poof into the air a bit, but try to mix it slowly and carefully to avoid this.
3. Play! You’ve now made thermochromic playdough! That means the dough will change color with heat, at around 65°F. When the dough is colder than that, it will be blue, and as it warms up, the color disappears and you’re left with off-white or plain dough!
4. How can you make the color change? Can you squeeze the dough in your hands and roll it around enough to warm it up? What if you put a piece in the fridge to see how cold it gets? What if you place piece of the dough against a cup of warm water?
5. Add your own playdough toys and tools to make this an extra fun activity!


Clean Up: This dough will last for 6-12 months. Simply place it back into the jar and continue to use it! If it dries out, add a touch of water and mix together. You can find more dough like this from SquishyDough!
What are they learning?
- Fine motor control: squeezing and squishing dough is one of the best things you can do to build up the muscles in your hand! It’s often a key component to occupational therapy, and is really important for future pencil-grasp.
- Science: the color change itself is science in action, and you can encourage children to experiment with the dough to try to fin the best ways to change the color. What is the fastest way to warm it up? Cool it down? What way works the best, but might not be the fastest? How long does it take to notice color change using just your hands?
- Vocabulary: “thermochromic” is a big word for little kids! So is “hypothesis,” which you can introduce as they start to experiment with the dough more. “What’s your hypothesis? What do you think will happen when you put the dough into the fridge?” To step up the scientific learning, you can even document their process and take notes of their observations!
Pom Pom Splat Snowman:
1. Scoop about half of the paint into a small bowl, add an equal amount of water, and stir to mix.
2. Cover your work surface with the dropcloth. If you have an apron or a smock, you may want to wear it! This activity is messy, but remember the paint is completely washable!
3. Place a piece of paper on top of your tray.
4. Dip a pom pom into the paint solution, and then place it on the paper. Use your hands to squish it down, making a splatter. Now repeat this with two more splatters on top of the first one, making a snowman!
5. What other shapes can you make using the splat method? What happens if you use a larger pom pom? A smaller one? What if you drop it instead of squishing it? What if have more paint on it, or less? If you have enough paper, you could even try watering down the paint more and trying the activity again to see what happens!

Clean Up: If you have leftover paint, you can use it in the Snowstorm in a Bottle activity next. Let your artwork dry, and either display it or use it as a holiday card for someone! Wipe up any splattered paint before it dries for the easiest cleanup.
What are they learning?
- Creativity: it’s empowering and freeing to be able to create openly! Children get to decide what to make, and work on their technique to make it happen.
- Process versus Product: This is a key component of Messy Play Kits’ products. We focus on the process of making rather then the final product. You don’t have to build a snowman, but painting in a completely new and different way is what the activity is really all about! Try something new and explore how it works!
- Making a mess: this might be a learning process for you too! It’s ok to make a mess, as long as you set up well for it and clean up afterwards. These are great life skills to learn!
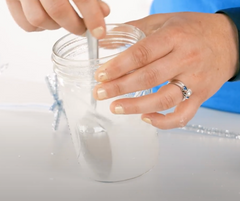
Snowstorm in a Bottle:
1. Scoop about half of the paint into a small bowl, add twice as much water, and stir to mix.
2. Pour the watered down paint into the bottle of oil. It will settle on the bottom, below the oil. (Why? Because water is more dense than oil, meaning it is heavier and will sink below. Same with the paint!)
3. Use a small spoon or funnel to pour some of the fizzing mix into the bottle. It should sink to the bottom. When it does, what happens? You’ll see it start to bubble and fizz!
|
IMPORTANT: keep the bottle open during the fizzing, Do not replace the cap until you’re absolutely sure the fizzing is done. Wait a few hours before replacing the cap, or the bottle may burst. |
4. Watch the paint bubble up through the oil and drop back down! Does it remind you of a snowstorm?

5. Continue to add fizzing mix slowly and watch the storm. You can do this activity all at once or save it and do a bit of fizzing each day.
6. You can also try adding more water to see if that makes the bubbling change.
Clean Up: when you’re done, the bottle can be saved for a fun sensory bottle! If you replace the cap and shake it up, the oil and water will mix temporarily. Let it sit still and you’ll see them start to separate again!
What are they learning?
- Science: This is a really cool chemical reaction! The fizzing mix contains baking soda (a base) and citric acid (an acid). When you combine those with water, it creates carbon dioxide gas, which is what bubbles up and creates all the fizzing fun! This is also an endothermic reaction, which means that it will feel cold as the reaction is occurring ( although you may not be able to feel that through the bottle).
- Science: Combining oil and water is a great way to lean about density! They may mix for a short time, but will always separate again. (Think about how this plays out in the natural world too- oil spills always float to the top of the water. What else can you think of?)
Salt Crystal Snowflakes:
1. First we need to make our snowflakes. To do this, cut one of each color of pipecleaner into 4 small pieces. Take two of the pieces and cross them over each other like an X. Take one of the long pipecleaners and cross the end of it over your X, and then wrap it all the way around your short pieces so it holds them together. You should have a 6-sided pipe cleaner snowflake now, with one of the sides much longer than the others. The long side will be your tail you use to hold the snowflake in the water!


2. Repeat this with the other pipecleaners and make as many snowflakes as you can. You can even mix and match the colors!
3. Now we prep our solution: Empty the salt into your heat-proof jar. Add about 1 cup of hot water, as hot as you can get it. You may need an adult to help with this part. Carefully stir the salt water. Watch as the salt dissolves. It will not dissolve entirely- some salt will still sit at the bottom of your container. This means we have saturated solution, or a solution that is holding as much salt in it as it can.
4. Submerge your snowflakes in your salt water solution and leave them undisturbed overnight.

5. Check on them the next day. You should see salt crystals forming on top of the pipecleaner snowflake in the jar. If you don’t see it, it may need more time. This process depends on evaporation, so it depends on how humid and warm the environment is.
6. When the salt crystals have formed, take the snowflakes out of the water and let them dry. You can cut off the snowflake tails now too!

What are they learning?
- Science: This is a slow scientific process, whereas the bubbling in the Snowstorm in a Bottle is a fast process! First, you need to have a solution that’s saturated, and warm water can hold more salt than cold water. The salt crystal formation is dependent on evaporation: as the water evaporates the salt is left in the jar, and it needs something to bond to. You’ll see crystals form on top of the water and on the bottom of the jar too!
- Patience: This project takes time! Use a piece of paper to document your observations every time you check to see how it changes.
More Polar Fun Play!
There are so many ways to continue learning about winter. Here are some of my favorites.
- Check out the Astronomy Picture of the Day from NASA. This is a great way to capture the interest of budding astronomers- the photos are incredible, and the descriptions are written by professional astronomers and contain lots of links to learn more!
- Make a Nebular Jar! This is a really easy project to do with materials you likely already have at home!
- Do your own experiment on surface tension! It's not related to space, but it is a really cool science experiment related to chemistry and the molecular makeup of the ingredients. Scholastic has a great writeup of the experiment as well as some questions to ponder (and an explanation!).
If you liked this Messy Play Kit...
