Amazing Animals Messy Play Kit Guide

Ready to dig into your Amazing Animals Messy Play Kit? On this page you'll find detailed step-by-step instructions, ideas to extend the learning, and some links to other resources. Feel free to reach out if you have any questions about your kit. Now go get messy!
Jump To:
Arctic Small World
Swamp Small World
Plains Small World
Animal Texture Bag
Animal Ice Painting
Additional Resources
More Messy Play Kits
Animal Small Worlds:
For the first three activities in this kit you will make three separate "small worlds" to play in with the small animals included in the kit. Try adding other animals, materials and props to expand on the small worlds created within the kit.
Arctic Small World
1. Empty the cornstarch into a medium size bowl and add the oil.

2. Use your hands to mix the oil into the cornstarch, breaking up all the clumps.

3. Add the glitter and snowflake sequins and gently mix together.
4. Pour the contents onto a larger surface- a baking tray with edges works well.
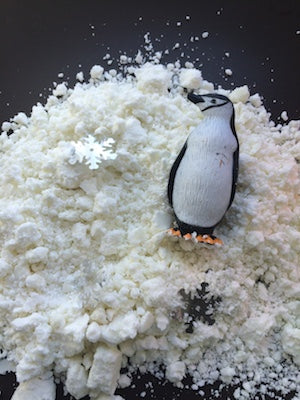
5. Build an arctic scene! Add the penguin and see what you can create with your “arctic snow.” Try building a snowman, or a mountain, or an icy glacier.


How can you expand upon this arctic scene? What other animals live in this type of climate? What plants can be found there? What type of geography is there (lakes, mountains, ice)? Do you have any toys that you can add to the scene to make it more realistic?
| TIP: The oil in this activity causes things to get slippery. Be sure to wash any toys you use carefully, as well as any surfaces this gets on! You may want to use paper towels for the cleanup rather than washable towels. |
What are they learning?
- Science: Basic biology: climates, animals, habitats, information about the world we live in.
- Fine Motor Control: When they squeeze the cornstarch to mix it together, the are strengthening the muscles in their hands. It’s a great way to build muscles they need for writing!
- Resourcefulness: As you’re playing together, look up together the answers to questions they ask that you don’t know. If they ask about a particular environment you’re not familiar with, google it together. You’re teaching them that while you may not know everything, you know how to find answers when you need them. That’s a great skill to learn!
- Dramatic Play: Children can express themselves and their ideas and creativity in dramatic play scenarios such as this one. They begin to learn that their ideas and opinions matter, a foundational part of developing healthy self-esteem.
Swamp Small World
1. Empty the gelatin mix into the aluminum tin.
2. Add 1/2 cup hot water and stir until the gelatin has dissolved.

3. Add 1/4 cup cold water and stir.
4. Place in the fridge to set. If desired, put the frog into the mix to let the gelatin set around the frog!
5. Once it has set (after about 4 hours), use a spoon to scrape the gelatin out of the bowl and onto a larger surface, like a baking tray or bathtub.

6. Build your swamp scene! Add the frog if you didn’t add it into the gelatin, or use your hands to break it apart and dig out the frog now. Try squishing some of the gelatin up so it’s less solid, and keep some in chunks.
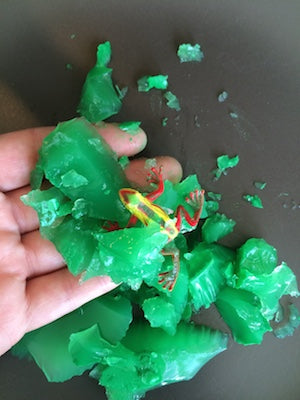
What other things can be found in a swamp, including animals and plants? Do you have any materials that you could add to make the scene more realistic?
What are they learning?
- Science: Basic biology: climates, animals, habitats, information about the world we live in.
- Science: Material properties: No doubt you’ll have a conversation about how gelatin works- it was liquid when they mixed it and poured it in, but now it’s a solid! A weird, soft, squishy solid. Use the words “transparent” and “opaque” to describe the gelatin vs. other materials.
- Patience: You can check on this material while the gelatin is setting when it’s in the fridge, but it does require some patience. It will be worth it, waiting until it’s fully set, but that can be hard when you’re little and excited about an activity! If they have a hard time walking away, set a timer for every 30 minutes (or any other time frame) and agree to check on it every time the timer goes off. Then play with something else in between.
Plains Small World
1. Carefully cut the tips off the 3 pipettes in the "rice colors" bag.
2. Open the bag of rice, squirt in the contents of all 3 pipettes, and quickly seal the bag shut.
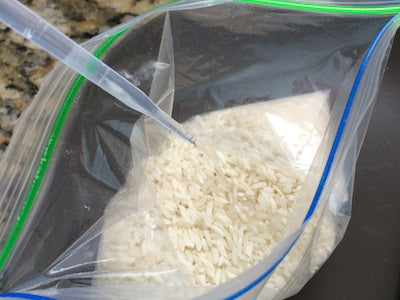
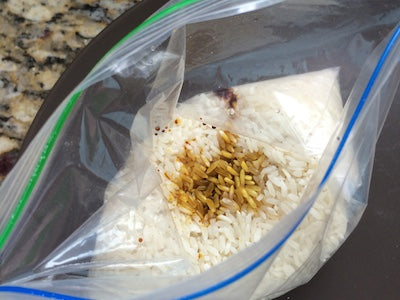
3. Shake the bag of rice until the colors have mixed thoroughly. You can also mix the colors into the rice in a mixing bowl fi that's easier.
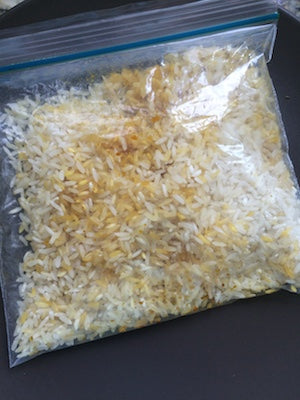
4. Pour the rice onto a large, flat surface and leave to dry. It may help to occasionally stir the rice around the ensure that it all dries.

5. Once it’s dry, you have your dry grass for your small world scene. Add the wild animal and use your hands to mold the landscape.

Think about what a plain looks like, and look up photos if you need to. Are there trees? Lots of water sources? What color is the grass there? What types of animals live there? Does it rain or snow? Where in the world can plains be found?
What are they learning?
- Science: Basic biology: climates, animals, habitats, information about the world we live in.
- Motor Control (fine and gross): Squeezing the pipette (fine motor) and shaking the bag of rice (gross motor) are great ways to use your muscles and build hand-eye coordination and muscle coordination.
- Math: Children love filling and emptying containers. They may enjoy just scooping the rice and dumping it out more than the dramatic play aspect of it being a plain. Provide them with a variety of containers (plastic storage containers, measuring cups, funnels, spoons) and let them scoop! They are learning the concepts of full and empty, the effect of gravity, their muscle control and self-awareness, and cause and effect.
Animal Texture Bag:
The Animal Texture Card contains four types of fabric that represent the textures found on various animals’ bodies. The drawstring bag contains matching fabrics. Remove the contents of the drawstring bag to show your child, then commence the game. This can be played in a variety of ways:
- Have your child close their eyes, and put one fabric piece into the bag. Have them reach in, feel the fabric, and guess which piece it is, using the Texture Card as a guide.
- Replace all the fabric pieces into the bag, and ask your child to pull out a specific type of fabric, one at a time. For example, ask them to find the fur, and then the sequins, and so on. Play again using the animal names instead of fabric names- this may be easier or harder for some children.
- Put two fabric types into the bag, and hide the other two. Have your child identify which two fabric pieces are NOT in the bag. This is tricky for younger children!
- Switch roles and repeat: your child hides the fabric pieces and you have to guess which ones they are!
Try to think of other textures that are similar to animal’s bodies- what would a horse feel like? What about birds? Do adult animal’s feel the same as baby animals? Think about dogs and puppies, or ducks and ducklings.


|
TIP: You can use the bag for other items as well! Collect a range of small toys, items and fabrics that can fit inside the bag, and repeat the game using those items. |
What are they learning?
- Representation: Young children are just learning that objects can represent other objects, which is foundational to the way language and communication work (a picture of a tree represents the word tree and the real object). Using fabric to represent animals is another way to teach them that objects can represent other objects.
- Creativity & Imagination: It takes a bit of a stretch to see that the sequined fabric is like fish scales, but once you make that connection, it’s fun to see how much further you can go. What other textures in your world can represent other items or animals?
Animal Ice Painting:
1. Remove the tops of each of the powdered paint containers.

2. Add one tablespoon of water to each container, replace the top securely, and shake to mix the paint.

3. Uncover, add more water and gently mix with a spoon.
4. Place one animal in each container and replace the top, if you can.

5. Place the containers in the freezer until frozen solid.
6. When they are solid, remove the tops and squeeze the cube of frozen paint out of the container onto a large surface. The bathtub works great for this part!

7. Place the pieces of art paper on the bottom of the bathtub, and move the cubes around on top of the paper. As they melt, they will create beautifully colorful artwork and reveal the hidden animals inside!


|
TIP: You can add the paint cubes to hot water in the bath too, to see them melt even more quickly and watch the colors mix together (great science lessons here!). |
| TIP: If you read this before you make the cubes, or if you are making them again with other paints, try making a rainbow ice cube block by pouring a few colors into one container before freezing. If you add the colors carefully, you can end up with separate colors within the same container. |
What are they learning?
- Science: Color mixing: If you make rainbow blocks, or as they melt and blend together. Discuss primary and secondary colors.
- Science: Property states (solid, liquid, gas): You can see the water going from solid ice form to liquid water form. Hopefully you won’t see the gaseous steam form, since that’s really hot, but you can talk about it. It’s all water in various forms.
- Science: Temperatures: The ice will melt much faster in hot water than in cold water or room temperature air. Why is that? Try more experiments with regular ice or colored ice and see what happens.
More Animal Play!
There are so many ways to continue playing with and learning about animals. Here are some of my favorites.
- The book Giants of the Land, Sea & Air, Past & Present, written by David Peters, is one of my favorite books about the largest animals through time. It covers animals both alive and extinct, all drawn to scale. They even have humans on each page to help young minds grasp how large these animals really are! The blue whale covers a few pages since it's so long! You can buy it used on Amazon or download it for free on Davis Peters' website here.
- This article from Young Children, an NAEYC publication, has great examples about how to support children's learning in ways that naturally extend their curiosity. NAEYC is a great resource for topics like this. One example from an old article they had is to use field guides and bird books to help identify the birds in your neighborhoods. If you're familiar with them, it's easier for you to tell the children's what the birds are, but they learn so much more from using reference books with your help. They will have to notice details about the bird's features, colors, call and surroundings, and compare and contrast it with other birds within the book in order to find the right bird. It's also a great lesson in learning how to find information when you don't know something, and will reinforce the idea that books are useful tools!
- Children learn so much from having pets around! Whether it's at home or in the classroom, children learn important life lessons as they care for and study animals. This article from Healthy Pets has great information on what having pets teaches children, and this article from PETA kids talks specifically about compassion as it relates to caring for pets.
- Local resources can be so helpful in learning about animals! Red Tricycle is a website where you can learn about upcoming events in your area for families with young children. I recently received an email from Red Tricycle about three great animal-related activities in the San Francisco Bay Area. If they cover your area, Red Tricycle is a great way to learn about upcoming events, animal-related or not!
