
Crazy Colors Messy Play Kit Guide

Ready to dig into your Crazy Colors Messy Play Kit? On this page you'll find detailed step-by-step instructions, ideas to extend the learning, and some links to other resources. Feel free to reach out if you have any questions about your kit. Now go get messy!
Jump To:
Bleeding Tissue Paper
Color Blending
Marble Painting
Additional Resources
More Messy Play Kits
Colorburst Oobleck:
1. Empty the bag of cornstarch into a mixing bowl. Pour it carefully so it doesn’t all poof up into the air.
2. Add a little less than 1/3 cup of water and stir until it’s fully mixed. You should have a substance that acts as both a liquid and a solid. When you scoop it up, it’s hard and cracks, but when you let it drip off the spoon, it pours like water.

3. Crush the color tablets into smaller pieces and spread out on a baking tray.

4. Pour the oobleck over the color tablets and watch as they start to dissolve into a beautiful creation!


5. Let it sit and watch as long as you want to, but then dig in with your hands! Explore the oobleck and see how the colors begin to mix together.
|
TIP: the color tablets may stain your hands temporarily if touched directly. However, you may wait until they are fully dissolved before touching them if you want to avoid any staining. Either way they are non-toxic and perfectly safe for skin! |


Oobleck is a non-Newtonian fluid, which means that the viscosity of the fluid depends on the shear force (in other words, when you put pressure on it, it acts as a solid, and when the pressure is gone it acts as a liquid). Imagine what the world would be like it other liquids acted this way (think about water, or milk, or blood in your body)!
What are they learning?
-
Fine Motor Control: Crushing the tablets up, as well as mixing and squeezing the oobleck, are great ways to build fine motor coordination.
-
Vocabulary: Most young children don’t know what Newtonian fluids are, let alone non-Newtonian fluids (lots of adults don’t either!). What a great way to learn a new vocabulary word, and if your child is asking more questions than you can answer, look up the answers together online (teaching them to be resourceful- what a great skill!).
-
Material properties: Oobleck is unlike most other substances, and it’s due to the properties of the cornstarch mixing with water. Do other substances mixed with water act this way too?
Bleeding Tissue Paper:
1. Place one sheet of the art paper on a large, flat surface (a baking tray works well).
2. Fill a small bowl with water and place it near the tray. If you’re worried about the water spilling, place it on the tray.
3. Rip the tissue paper into smaller pieces or various shapes and sizes.

4. Now decorate the art paper with tissue paper! Use the paintbrush to spread water around on the tissue paper- it will act as glue to stick the tissue paper to the art paper. You may overlap colors of tissue paper, put one piece on at a time, or place each piece and then paint water on top.
| TIP: The tissue paper colors bleed so they may stain hands. If you use the paintbrush to spread the water, you can avoid getting wet tissue paper on your hands. |

5. You can immediately see how the tissue paper colors bleed onto the art paper and each other. You can enjoy the colors mixing this way, and let it dry and leave it alone. Or you may let it dry and then peel the tissue paper off the art paper to see the designs left behind!

6. There is an extra piece of art paper so you can repeat the project.
I let my tissue paper dry for a few hours, and then peeled it off. Look at how cool the stained paper looks!

What are they learning?
-
Science: Color mixing! Watch how the colors blend together as you layer the various colors of tissue paper together. Can you predict what color they will combine to make? What happens if you add only a little bit of water? What happens if you add more?
-
Cause and effect: The tissue paper doesn’t do anything when it sits on the paper, dry. It’s only when you add water that it sticks and the colors begin to seep.
-
Material properties: This is a special type of tissue paper- other types won’t have the same effect. Try it with tissue paper from home- do those colors bleed when wet?
Color Blending:
1. Spread out the coffee filters as flat as possible and place on a baking tray.

2. Cut the tips off the pipettes and slowly drip the colors onto the coffee filters in a scattered pattern.
3. Try to drip the colors as slowly as possible. Squeeze one drop on one of the filters and watch as the color spreads.

4. As you continue to drip the watercolors on the coffee filters, watch as the colors spread and blend together.


5. Let the coffee filters dry, and then hold them up against the sunlight in the window!

6. To make a butterfly: Pinch the coffee filter together from top to bottom (like the 12 and 6 o’clock marks on a clock). Fold a pipe cleaner in half around the pinched part of the filter, and twist. You should have two ends of the pipecleaners sticking up like antennae.


7. To make a flower: Pinch the middle of the coffee filter cone, and then twist a pipe cleaner around the pinched section. The rest of the coffee filter should stick up.


What are they learning?
-
Scientific language: Use language like “observation” and “hypothesis” as you’re asking your child what they see and what they predict will happen. Can they predict (or hypothesize about) which colors will be created by combining two other colors? What do they observe happening when they drip a small amount of water on top of the coffee filter?
-
Color mixing: That’s what this kit is all about! The colors blend in this activity in a different way from how they mix in the other activities.
-
Fine motor coordination: Squeezing the pipettes to get only a few drops out at a time is fairly complicated. It requires great fine motor control as well as inhibition- they have to stop themselves from squeezing them out completely in one motion. If they do that, that’s fine too!
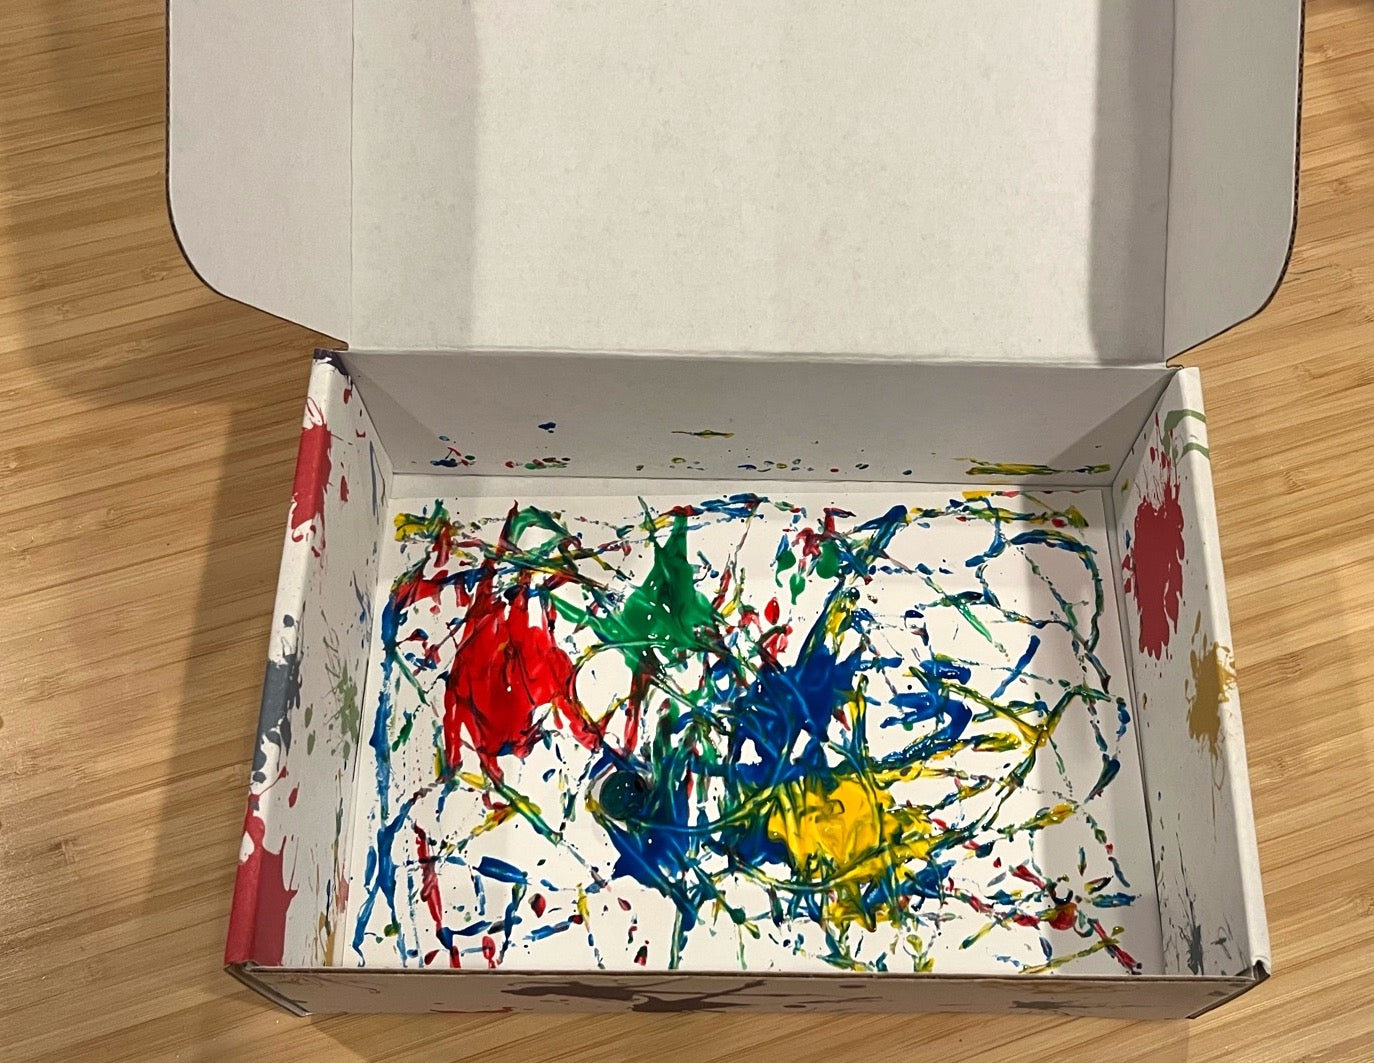
Marble Painting:
1. Empty the Messy Play Kit box, and then place one sheet of art paper on the inside of the box. You will use the box as the frame for your canvas in this activity.

2. Remove the tops of the powdered color containers, add one tablespoon of water in each container, and replace the tops. Shake them to mix up the paint, then remove the tops again.


3. Drop the wooden marble into one of the paint colors. Use a spoon to scoop the marble out and drop it into the box, on top of the art paper.


4. Carefully pick up the box and move it around to roll the marble. Watch as it leaves a trail of paint behind it!

5. Repeat with other colors, using a spoon to dip the marble into various colors. You can even carefully pour some paint onto the paper too!


6. There’s an extra piece of paper to repeat this process a second time!

| TIP: If you have glue and glitter, you can dip the marble in glue and roll it around in the box too. Then shake a bit of glitter on top before the glue dries! |
| TIP: If you saved the bubblewrap used in packaging and have some extra paint, use it for added texture with your marble painting artwork or on another piece of paper! It makes such a unique and fun texture when you stamp it in paint and then onto the paper! |
What are they learning?
- Color mixing: The colors in this activity will likely not blend as much as in other activities, but they may as you move the marble from one container to the next.
- Motor coordination: Holding the box and moving it in a variety of ways to get the marble to move all around the paper- that’s hard! It also takes a great amount of skill to move the box enough to make the marble roll around, but not so much that the marble falls out of the box. If it’s too hard to tilt the box, try keeping it flat on the table but quickly moving it from side to side.
- Creativity: They get to make the artistic decision here- which colors to use, how much of each, which directions to roll the marble, whether to try glue and glitter or not… It’s a powerful feeling for young children have, and very empowering.
More Crazy Color Play!
There are so many ways to continue playing with and learning about colors. Here are some of my favorites.
- If your little one is still learning colors, there are lots of great articles that can help! This article by Munsell talks about how children learn this type of information, plus a few fun books to read and other activities about color.
- One of my favorite books about color and color mixing is "Little Blue, Little Yellow" by Leo Lionni. It's a fun adventure of two friends plus some fun color mixing! You can see it on Amazon.
- Food coloring can be a great way to explore color mixing, but it can also stain hands. I prefer using liquid watercolors, as they are nontoxic but don't stain! They also come in a much wider variety of colors. The best quality liquid watercolors come from Discount School Supply, who has a wide variety and larger quantities. Like food coloring, a little bit goes a long way, so keep that in mind if you are thinking of purchasing any!
- For another fun way of painting using something you probably already have in your kitchen, head over the The Imagination Tree! You'll love these wacky paintings.


