Outer Space Messy Play Kit Guide

Ready to dig into your Outer Space Messy Play Kit? On this page you'll find detailed step-by-step instructions, ideas to extend the learning, and some links to other resources. Feel free to reach out if you have any questions about your kit. Now go get messy!
Jump To:
Galaxy Slime
Colorful Ice Craters
Alien Eggs
Relax Timer
Additional Resources
More Messy Play Kits
Galaxy Slime:
1. Remove the top of the clear glue bottle and empty it into a small mixing bowl. Don’t worry if a few drops are left.
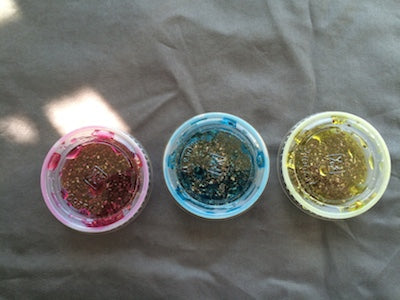
2. Add both the powder and liquid “slime colors” to the glue, as well as the bag of biodegradable glitter. Mix until thoroughly blended.
3. Add one tablespoon of warm water to the glue mixture and stir. Add one teaspoon of the liquid starch to the glue mixture and continue to stir. You’ll see the mixture start to coagulate. Continue to mix. Continue adding the liquid starch one teaspoon at a time, stirring to fully incorporate it as you add. You won’t need the entire bottle of starch. You’ll see the mixture start to pull away from the bowl and stick to itself more and more.


4. Touch the slime now. If it’s still sticky, continue stirring in liquid starch until it comes together and stops sticking to your hands (about half the bottle). When the slime doesn't stick to you, it’s the right consistency! It should stretch and droop, but not be sticky.


5. Now enjoy it! Play with the slime- bend it, stretch it, let it drop but catch it before it hits the floor! This special thermochromic slime changes color based on temperature (around 85°). Try warming it in your hands or placing it in the fridge for a few minutes to see what happens. You can even microwave it for 5 seconds to see the color change, but remember it may be hot.

| TIP: Slime is made of entirely washable ingredients, but it will stick to clothing, skin, and anything else it touches. It sticks to itself well, so use that technique for getting it off your hands. Be careful not to get it on carpet or other non-machine washable items, because that would require lots of hand scrubbing! |
| TIP: Save the glue bottle for use in the Relax Timer activity |
What are they learning?
- Fine motor control: Squeezing pipettes, unscrewing caps, pouring and mixing are great for strengthening fine motor control and building self-help skills.
- Patience (social-emotional skills): Children develop patience as they wait for the slime to come together- you sometimes have to let it sit for a few minutes in order for it to form properly.
- Hand-eye coordination: They have to aim to pour the materials into the bowl without missing. They also will be stretching the slime but trying not to let it fall on the table or ground, which takes quite a bit of coordination!
- Science: They witness a really interesting chemical reaction and learn about material properties when they see how the glue and starch mix and change to become slime.
Colorful Ice Craters:
1. Fill the aluminum pie tin with water and freeze until solid.
2. When the ice is frozen solid, pop it out of the tin and place on a tray with an edge (a cookie sheet works perfectly). If needed, run it under warm water to help it release from the tin.
3. Cover the ice block with salt. It doesn’t need to be an even coating, actually, having pockets of salt will help this experiment!. If you listen carefully, you can hear the ice start to crack from the salt as it sits there!
4. Using scissors, carefully cut the tip off of all the 4 pipettes of liquid watercolors. Squeeze each color into a separate bowl, and add 1-2 tablespoons of water to each color.
5. Using the now-empty pipettes, slowly squirt the liquid watercolors onto the ice and watch as the colors drip down.

6. Continue dripping the colors on the ice, mixing the colors and covering the ice block.


7. Watch the ice carefully as you drip the color on it. Can you see the craters and crevices the salt is making? The colors make it easier to see.
What is the salt doing to the ice? How is it forming those craters? As the ice melts, the salt dissolves in the melted water and lowers the freezing point, which means that the salt water won’t refreeze. It makes crevices, craters and tunnels depending on how much salt is in each spot.
| TIP: Repeat the experiment by freezing water in various shaped containers- small, shallow tupperware containers and tall, deep ones. Do you notice a difference between the various ice blocks as they melt? |
What are they learning?
- Science: There's so much science in this activity!
- Cause and effect: the effect of the salt on the ice is fairly complex but the visual and concrete nature of the experiment makes that more easy to grasp.
- Color blending: the colors make the crevices stand out more, and they also blend together as they seem through and around the ice.
- Temperature: The ice itself is very interesting, and children learn about temperature as they watch the ice melt in the warm room. You can try freezing another ice block and experiment with pipettes of warm water- see how quickly the warm water tunnesl through the ice!
- Patience: Children have to wait for the water to freeze before they begin this experiment, which can be challenging sometimes.
- Fine motor control: Pipettes are great for this!
Alien Eggs:
1. Gather 3 small bowls, and place one color tablet in each bowl.
2. Roughly divide the chia seeds between the three bowls.
Before you soak the chia seeds, look at them carefully. What do they look like? What color are they? What do they feel like? Write down your observations. Later, investigate the soaked chia seeds and take note of your observations. Compare your notes about the pre- and post-soaked seeds. What changed? What stayed the same?
3. Add two tablespoons of water to each bowl and stir.
4. Let the chia seeds soak up the colored water for at least 4 hours, or overnight if possible.

5. Empty all three bowl onto a large flat container that has edges, like a baking sheet or the bathtub.


6. Dig in! Feel the “alien eggs” with your hands, and squish them between your fingers!

| TIP: The chia seeds will stick to clothing really well. The easiest way to get rid of them is to wait until they dry up and the brush them off. You can also brush the seeds off after washing and drying the clothing, but remember to check your lint filter for the dried seeds! |
What are they learning?
- Patience: It's hard to wait for the seeds to soak up the water! Luckily you can observe them carefully during the waiting period
- The Scientific Process: When you ask children to make hypotheses and observations (use those terms too!) you’re encouraging them to think scientifically. You’re also showing them that science is fun, and that fun can also be scientific. Write down their thoughts and comments about the textures, the colors, their observations during the hydration process, and compare notes before, during and after. This shows them that you value their thoughts and ideas, as well as giving you something concrete to remind you about what they learned!
- Science: They learn about color blending as the chia seeds begin to mix together. You'll probably end up with a brown blob of chia seeds, but that's a great way to show how colors mix to make other colors.
Relax Timer:
1. After you have made the slime, rinse out the small plastic bottle that contained the clear glue. If residual glue is in the bottle, that’s fine.
2. Unscrew the top of the glitter glue pen and empty its contents into the empty glue bottle- you may not need the entire glitter glue pen. Also pour in the small bag of sequins.
3. Fill the large bottle 2/3 of the way with hot tap water, replace the cap, and shake to mix. Continue shaking until most of the glitter glue has dissolved.
4. Fill the large bottle to the top with hot water, letting the bubbles spill out into the sink. Replace the cap and shake again.
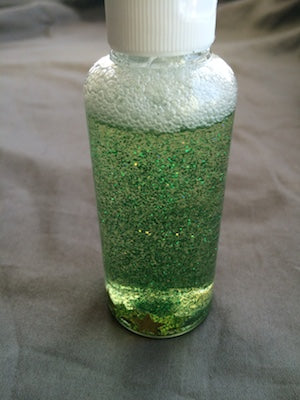
5. Your “Relax Timer” is now ready to use! When you shake it up, the glitter and stars swirl around. As you continue to watch, they begin to settle on the bottom (the middle photo below shows the glitter settling). It’s relaxing to watch them swirl around more and more slowly!


| TIP: If you’re worried about someone opening the bottle and spilling the glitter solution, use a permanent adhesive such as Krazy Glue to secure the top. Unscrew the cap, make sure the inside of the cap and the outside of the bottle are both dry, and squirt a little glue on the outside of the bottle top. Replace the cap and let it sit for a few minutes to dry entirely. |
| TIP: This timer is great for using as a short timer for brushing teeth or other short activities, by beginning the activity when you first mix up the bottle and continuing until the glitter has fully settled. |
What are they learning?
- This timer is relaxing to watch, so use it as a method of calming down when you’re upset! Take the timer to a private space (the couch, your bed, the stairs) and watch the glitter swirl as you take deep breaths to calm down. Do you feel better now? Children learn many things from imitating your behavior, so model using the relax timer in your daily life and you’ll notice them to start to incorporate it as well. The same goes for manners- if you say “please” and “thank you” you’ll find it’s easier to ask your children to say them too!
- Teaching children concrete methods of emotional regulation, like using an object as a timer or a reminder to take deep breaths, helps them take control of their emotions and learn how to manage them. Everyone feels happy, upset, angry, and sad; it’s important to acknowledge these emotions and learn how to deal with them appropriately. Using a timer like this can help children learn what to do with strong emotions (both positive and negative) and empowers them to take control of their own body. The Center on the Social and Emotional Foundations for Early Learning (CSEFEL) is a great resource for education on children's emotional development.
- You may find that you need to make a larger version. Use your own recycled water bottles and extra glitter and glue.
More Outer Space Play!
There are so many ways to continue playing with and learning about Space. Here are some of my favorites.
- Check out the Astronomy Picture of the Day from NASA. This is a great way to capture the interest of budding astronomers- the photos are incredible, and the descriptions are written by professional astronomers and contain lots of links to learn more!
- Grow your own space crystals! All it takes is hot water, a container, and some ingredients you probably have in your kitchen... Find a few different recipes on the following sites:
- Salt crystals on a string from The Science of Cooking.
- Salt crystal gardens from Babble Babble Do.
- Do your own experiment on surface tension! It's not related to space, but it is a really cool science experiment related to chemistry and the molecular makeup of the ingredients. Scholastic has a great writeup of the experiment as well as some questions to ponder (and an explanation!).
- Follow an astronaut's blog! Captain Chris Hadfield blogs from the International Space Station here. Follow other astronauts on twitter too: Sam Cristoforetti from Italy is @AstroSamantha. Reid Wiseman from the US is @astro_reid. Astronaut Abby isn't a real astronaut, but her blog is really informative!
- This YouTube video by Cary Huang is a great way to explore the Scale of the Universe.
If you liked this Messy Play Kit...
